
ORDER SECURELY ONLINE! OR give us a call on the toll free order line 877-639-1543 9-6 CST, M-F (405-601-5288 in Oklahoma or outside U.S.) 405-601-5301 tech support NEW FAX 405-445-0796. Remember our bottom line price includes shipping! We stand behind the products we sell with a 30 day warranty less shipping and handling (90 day warranty on systems). Prices subject to change with out notice. Questions? Try our HELP file first. Need hardware help? Read Bob's Mac Tech Tips. Why use reconditioned equipment? See the Mac Comparison Chart! All large orders have to be signed for. Operator Headgap Systems, Inc.,7308 S. Klein OKC, OK 73139 Contact Us.We can provide you options and software for your installation if you do have trouble. Give us a call!
OSX Notes for B&W G3 Systems
Updated 4-1-2013
Make sure you absolutely and solidly have a backup of all data before starting.
We do not provide free support for systems user upgraded to OSX. If you call with an OSX related question please do us the courtesy of dialing on your dime. We are always happy to help, but please use the tech support 901-591-1548 number.
How much ram and hard drive do I need?:
We recommend 512MB or more. Apple says a full install requires 128MB of ram and 3GB of drive space. That means of course you really should have 6GB available and 256MB or ram or more. Personally I run X on a Beige DT with a 400 mhz processor, 512MB of Ram and a 60GB hi speed hard drive (properly partitioned for X of course). I recommend at least a 400 mhz processor. It will run on even a 233 but we think you will not be happy working any slower. Don't let anyone kid you, all things being equal 9 is faster. Realize now that you will actually be slowing down when you install X. You need at least 256MB of ram, 384 or 512 is better. More is always better. A full install requires 3 GB of drive space. With the enormously fat Applications etc, you would be quickly out of space with anything less than the 8GB. A 4 GB is marginally okay but if you can upgrade to a 6 or larger.
First off read all of the information below especially on how I install OSX. If you screw up and have to restart the machine, you can get the machine into a state at which it no longer works at all. Pay careful attention and you won't have troubles. If you do run the reset routine I describe below. You may have to hit the CUDA switch so before beginning make sure you know how to recover your machine or don't start.
When we say a machine is OSX ready what we mean is Apple says this machine is supported and you have the necessary ram and drive space to meet the install requirements. You need to read the instructions included with any options installed on your system such as processor, graphics card, CDRW Drives etc. before starting as each require special drivers. If you have a special processor check with the processor manufacturer's web site before installing.
CHECK BEFORE INSTALLING! REV1 or REV 2 Blue and White PowerMac G3 Motherboard?
I will not install or repair REV 1 systems that have OSX installed. I cannot recommend installing OSX on a REV 1 Blue and White. These older Blue and Whites work perfectly with OS9.2.2 and in my opinion it should be the highest OS ever installed on one. If you choose to install X be prepared to reinstall every time your drive gets fouled.
I have had serious problems installing OSX on SOME Rev. 1 Motherboarded systems. How I solved the problem was to install a Sonnet ATA133 Card. Not only did this improve the performance of the hard drive it substantially improves burning performance when hooked to the optical. If you have a Rev. 1 Motherboard and are installing X if you have trouble this may be your solution. You may have no problems by the way. I have had installs go on just fine. What the differences are have to do with differences in the machines. These earlier motherboards don't communicate as well as the later boards. I had someone return a Hitachi drive saying it was not X compatible after taking it to the Apple Store in his area. This is crap. Hitachi makes the best drive mechanisms in the business. We have many customers with OSX installed on them. I use these exclusively in our business and all our servers are so equipped. My OSX running Beige Box has a Hitachi 80 GB and has for over a year now. Drives brands are not the issue.
Blue & White Revision 1 logic boards only support one internal IDE hard drive. However, this limitation can be easily conquered by adding a PCI ATA card. I have heard that Rev 1's also don't like drives above 12GB but I have no idea if this is true or not and have been installing and using up to 120GB drives on the Rev. 1 boards. Rev 1's may not as dependable as the Rev. 2 though and if you own one I would have a good backup plan in place in case there is trouble. Some folks have told me they used an X compatible SCSI card and SCSI drives which should also eliminate the drive communication problems.
I do find that the Rev1 boards are a bit more finicky than others and avoid them when I can. These were earlier slower versions of the system. If you have a system with one of these old mboards in them and plan on upgrading, I would put an Sonnet ATA 133 card in if you plan on large or dual drives to be safe. I would also make sure they have the Boot ROM v1.1f4 installed.
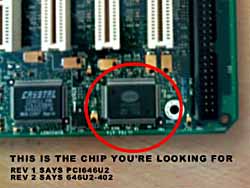
This is the left rear corner
of the motherboardHere's how you can tell if you have what logic board you currently have in your Blue & White G3: Check the number printed on the CMD chip at location U1. The CMD chip on Rev. 1 logic boards is PCI646U2 and on Rev. 2 logic boards is 646U2-402. To find the location of the CMD chip on the logic board, get a flashlight in shine it on the chip near the left rear of the motherboard as you face the open case. I just look for the hyphen in the number. If you have a hyphen you are on a rev. 2 motherboard.
If you are using a rev 1. BW system make sure you frequently run disk first aid and keep a solid backup. You are more likely to have drive problems. I also suggest you stick with slower smaller drive mechanisms, or partition the drive if it is a large one putting the OS stuff in the first partition always.
I recently have attempted to install Panther (OSX 10.3) on several Rev. 1 motherboarded Blue and Whites. I had all kinds of trouble and ended up installing an Sonnet ATA card in one. The other I upgraded the guys system to a Rev. 2 motherboard. I had installed several Panther versions on a few others but the user ended up having trouble a few weeks later and even after reinstalling the problems repeated. I really can't recommend you install anything later than Jaguar 10.2 on a Rev 1. system and really suggest you stay with 9. Upgrade to a Rev 2 system if you want to run Panther or Tiger. All modern versions of OSX runs perfectly on Rev 2. systems.
I have had a few different folks tell me that they run OSX with good luck on B&W Rev 1 systems by installing and UltraWide SCSI Card and a good size SCSI UW Drive. Since many of the issues are the communication with the IDE bus perhaps this may be an alternative solution for you. I haven't personally tested this and know that some cards are not OSX compatible. I do stock UW cards and drives so if you want to give this a try let me know.
Where is the CUDA Switch?
- On Blue and Whites they are left of the processor and there are two. One really isn't a CUDA it is a reset. The CUDA is on the left as you are facing the front of the computer.
ROM UPDATES:
Rom updates should be kept current on all Macs that use them. Check Apple System Profiler/Product Information/ROM Revision.
- If you have a Blue & White tower Yours should say 1.1f4.
- If you have an iMac Slotload or Trayload yours should read 4.19
- If you have a G4 SawtoothTower yours should read 4.2.8, newer G4 models may have a later version.
The updates are available on the Apple Web Site or of course on the Kitchen Sink CD. Follow the directions.
OTHER FIRMWARE UPDATES FOR X
A list of required firmware updates is listed on Apple's web site. Do this before installing X. http://support.apple.com/kb/ht1395
I can't get my B&W G3 to boot from a CD:
WHEN BOOTING THE X INSTALL CD YOU SHOULD HAVE A USB KEYBOARD AND MOUSE!
I am not sure why some Blue and White systems are so obstinate about not wanting to boot from a CD or DVD. I have went so far as to unplug the internal hard drive to force the machine to boot from a CD (this is not a solution though). Generally though if you zap the pram 3 times and then hold the C key down while booting the machine will boot from the CD. You may also try mounting the CD before turning off the machine and then choose it from the control panel startup.
You probably know that holding down the C key will force your system to boot from a CD or DVD. Holding down the Option key during startup will bring up the Startup manager. Select the CD and start again. This works sometimes when the CD refuses to start with the C key.
On systems with ZIP drives use the Zip Tools to make a bootable backup disk and boot from it. You can then install from the CD to the systems hard drive. I keep one of these around with a copy of Norton Disk Doctor and Speed Disk along with the required (Norton Shared Lib) extension, since you can use Command-Option-Delete-Shift (CODS) to make it boot from the zip disk. CODS is the answer. Just think greasy fish. Command - Option - Delete - Shift.
The Blue & White and Yikes G4 systems are NOT FIREWIRE BOOTABLE. Don't purchase an external DVD or CD unit and expect to be able to boot from it. If you need a DVD/Player or Burner see our web site and install it internally. We include pictured instructions and it is easy to do. We have the stock DVD Player mechanisms in stock for cheap. If you want the best the Pioneer SuperDrive will be bootable and allow DVD movie playback with our patched player on systems with ATI16MB Graphics cards or better (most had these). I also recommend you add an aftermarket firewire card. The firewire in these earlier boxes tend to choke in moving large amounts of data. A modern inexpensive Firewire card will give you better and more reliable performance.
Know how to recover your machine or don't start Before you install or if your machine fails and you can't get it to come back up:
DEEP LEVEL RESET TIP: On G3 and G4 Machines especially when aborting an OSX install really scrambles the computer. You can super reset the computer by Zapping the PRAM 3 times in a row. Then move your fingers from the P R keys to the O F keys (in other words Command - Option - O - F). COOF will bring up a machine language screen. <return> means press the return key you don't type the characters out. At the prompt type the following:
On iMacs, Blue & White, G4 Towers you want to include resetting the NVRAM.
reset-nvram <return>
set-defaults <return>
reset-all <return>If that fails hold the CUDA switch down for 15 seconds and run through zapping the pram sequence listed above. Need help resetting your CUDA? Read Bob's Mac Tech Tips.
The Blue and White G3 systems even with substantial upgrades will not run Leopard OSX 10.5.
There are problems with the OSX 10.2, 10.3, or 10.4 when installing on some systems. Based on my experience:
- OSX SHOULD be installed in the FIRST Partition of your drive if you didn't know. I don't usually partition drives on Blue & White (except REV1's) but if you must, make sure it is about 12GB's or so.
- Make sure you are using a USB Keyboard and Mouse.
- Turn off all energy saver settings. (Don't just disable the ext., it leaves the prefs running).
- Pull all PCI cards (leaving the stock Ultrawide card if you have one) and unhook everything from the back of the machine besides the powercord and the keyboard, mouse, and monitor, remove any zip media.
- Set my extensions to OS 9.2 only.
- Run disk first aid (Do not install if you can't get a clean bill of health on the drive).
- I then zapped the pram as described above and reset the firmware.
- I did not press the CUDA switch.
- I restarted with the C key held down and the X disk in.
- I did a Custom Install and deselected the 12 or so languages I don't speak and only selected the printers I use.
- Don't have it format the drive unless you really want everything wiped off the drive!
- You really should sit through the install which is long and boring and click the menu bar of the installer every once in a while. The system tries to go to sleep without activity especially during the second CD. Including all updates takes several hours to complete an install with all updates.
- If your install fails the first time pull all of your ram except one 256MB stick in the first slot. I am not sure why this works but it does. You can add the ram back after you finish installing.
If things go well you should be able to boot in X now. Setup two accounts to start with and don't forget the passwords. One with Adminstrative access and a second personal account. Use the Admin account to install new software. You are now ready to add the updates to get your OSX and applications up to date.
NOTE: It will take longer for your system to boot and synch with your monitor when booting into X. Be patient.
NOTE: If your monitor doesn't synch after the first CD finishes, you may need to try another monitor. I have had to swap monitors to get an install done. It worked fine with the original monitor after installing, although I had to zap the pram on some systems.
NOTE FROM RICK (a Headgap Customer): Bob - thanks for your time on the phone today. Switching from a LCD to a CRT revealed the problem. To recap: It's a BW G3, rev2 main board, boot ROM v 1.1.1f4, plenty of RAM and HD space. I booted from panther install disk 1, started a custom install to exclude all the non-essentials other than X11. Install took about 30min, never asked me to switch CDs, then gave me a 30-sec. warning before rebooting (all normal so far). Startup chime sounded, the LED on my LCD turned green, then amber. It stayed amber, thus no video. I switched to a CRT monitor, booted from install CD 1, started a custom install to exclude everything but X11. Within a few minutes, it was finished with CD 1, rebooted and was asking for CD 3. This was the step it couldn't take before (unable to successfully sync the LCD monitor). Installation from there on was a breeze.
TIP: Once you finish updating the system run the OSX Disk Utility and repair permissions from the startup X CD. You should do this anytime you install new software. I like and use a shareware program called System Optimizer (Kitchen SInk for OSX Diagnostics folder) that performs a whole series of maintenance on your system all at once, including repair permissions. Disk First Aid though requires you boot from the first CD.
OSX is a multiple user based system unlike what you are used to on the older OSes. Notice when you install anything logged in as a user it may only be accessible by you when you log in as that user. That goes for music, pictures etc. Understanding how this multiple user system works will help you learn to use this OS. Things you want to be accessible to all should be installed by the admin level account. Before and after installing it is a good idea to repair permissions.
ENABLING THE DVD or CDRW FOR OSX:
After you install OS X, you'll need to run Patchburn to create a driver if you have a special CDRW or DVD/CDRW or SuperDrive.
- PatchBurn1.1en.sit is for OS 10.2 Jaguar
- PatchBurn3.1.x is for OS 10.3 Panther
- PatchBurn 4 is for OS 10.4 Tiger
OTHER ENABLERS:
If you have a SONNET or other aftermarket processor I recommend you visit the site and download any needed patches before starting. If you have a Realtek 10/100 card you will need to install the patch (rtsmacx(110).zip) from the Kitchen Sinks OSX folder after installing X. The stock 10/100 is supported as is USB and Firewire. You may have a special graphics card or other PCI cards that need updates. Check before starting!
Using OSX Quartz Extreme with your Radeon 7000 PCI Card - Do this at your own risk!
http://www.insidemacgames.com/news/story.php?ArticleID=6141
Enabling Quartz Extreme for PCI Macs? (on Jaguar OSX 10.2.x)
You could just use the PCI Extreme program on the Kitchen Sink for OSX in the driver folder or you can do it the hard way as I did it the first time:
I recently added a Radeon 7000 to my beige desktop system running 10.2.8 and enabled Quartz Extreme. I can't tell a lot of difference but it probably didn't hurt anything. I am pretty sure this will also work for the ATI9200 PCI card.
A recent post to the Ars Technica Mac forums revealed it is possible to enable Mac OS X 10.2's Quartz Extreme on Macs without AGP video cards. While not necessarily game-related, many gamers have upgraded Beige or B&W PowerMacs with PCI Radeon or Radeon 7000 cards from ATI , and those brave enough can now try it out.
The modification requires the user to change one file and restart, though please only do this if you're well aware of the dangers it could pose to your system, and understand that it's not an official Apple practice .
While many IMG readers have verified it does work, there are reports of some glitches with movies playing in the background and stuttering on terminal transparency windows. If you're up to the task, first make sure you "su root" and follow the instructions from the Ars poster:
Open the config file
/System/Library/Frameworks/ApplicationServices.framework/Versions/A/Frameworks/CoreGraphics.framework/Versions/A/Resources/Configuration.plist ...
Change IOAGPDevice to IOPCIDevice
Restarting should enable Quartz Extreme, which can be verified with a simple "Quartz Extreme Check" application available at Versiontracker. Creative users are also finding they can enable Quartz Extreme on a secondary PCI card if they have something else like a Radeon 8500 in the AGP slot by adding the IOPCI line instead of overriding the AGP line, but as always, be very cautious with any such modifications. Remember to reboot and run the repair utility in X and allow it to fix permissions.
For those concerned Quartz Extreme might negatively affect game performance, OpenGL guru Kenneth Dyke recently made a very informative post to the IMG forum explaining exactly how VRAM is used in Jaguar. He notes that for fullscreen games, the VRAM is used the same by any OpenGL application --whether it be a game or OS X 10.2-- so there is no danger of the OS "hogging" memory from a game. Check it out for the full scoop.
You may have no problems and many of our customers are successfully running OSX on custom boxes purchased from us. I now have OSX 10.2.8 on my desktop bench system (Beige G3DT with a 500 mhz Processor ) although I still use 9.2 most of the time on it. I presently run 10.4.11 on a Digital Audio Tower using my older software in classic mode. One thing I have learned over the years is not to be the first person to install a revision. Sites like MacFixit.com and even Apple's are full of the grief people go through. Usually if you wait a short while and revisit those sites most of the problems have solutions. I would encourage you to study up before installing.If you are totally unable to recover your machine, we will be glad to restore your machine. Simply call our toll free number 1-877-639-1543 9-6 CST M-F for an RMA number and pay the shipping both directions and a nominal $35.00 bench charge assuming there is no mechanical damage. We do install OSX for you. Call for more information.
OSX Tips for All Users Since OSX is a user based system designed around BSD Unix there are a few things that most Mac users haven't had to contend with. One of which is permissions. When you install software or fonts that you intend for everyone on your system to use you need to install them from the main user which is sometimes called Admin or Adminstrator account. It was the first account you set up when you first installed your software. If you install it from one of the user accounts it will only be accessible by that account.
BEFORE AND AFTER YOU INSTALL SOFTWARE and on a regular basis run the Disk Utility (in the Utilities folder) and repair permissions.
Another handy program is System Optimizer X. It is on the OSX Kitchen Sink in the Diagnostics folder. It runs all of the maintenance on your system on demand. It is a $12 shareware program but the demo works fine until you decide to register it and this one is well done, so try it and register your copy.
Lose Your X Password or Need to Change It?
Boot up from the first OSX install CD by placing it in the drive and holding down the C key. When it comes up choose Reset Password from the Menu and follow the instructions.
X and Norton? NEVER!
I can't recommend Norton for OSX. You certainly don't want to boot into 9 and run a Disk Doctor. Early versions will trash the drive since there are many changes to the drive format that X adds and there were problems with the one made for OSX and they now no longer produce it. I have used Tech Tool X but my best advice at this time is the use the disk repair program when booted from the original X install disk at this time. Disk Warrior is okay for drive recovery but it should not be used for maintenance. Do this periodically and it will help keep your drive healthy.
HOW DO I BACKUP MY X INSTALL?
Carbon Copy Cloner (http://www.bombich.com/software/ccc.html) is on the X version of the Kitchen Sink. This puppy allows you to backup your OSX drive to an internally connected drive or an external Firewire drive (this will only work for booting with built in Firewire and will not work on Blue & White systems). This will make a bootable backup! It can also be used to recover parts or all of your X install. This solved one of the main objections I had to X and why I was not an early adopter.
If you don't have an internal second drive consider purchasing one (rev 2 motherboard). We will talk you through the install if you need help.
TIP: On older systems like your Beige DT and MT's and early iMacs you have to use a command in the menu of Carbon Copy Cloner called Bless Old World Target Drive. This is not well documented and is absolutely essential. If you don't bless it your drive will not appear and will show up as damaged under repair programs. Remember on older systems it has to be LESS THAN 8GB partition for X to recognize it. One final note. I usually end up having to manually copy the OS9 System Folder over by hand. In fact I usually just finder copy the OS9 folders over and only use cloner on the OSX stuff.
My OSX JUST SITS THERE SPINNING THE BEACHBALL AND NEVER FINISHED BOOTING? or maybe you get the Kernal Panic Screen (charcoal gray panel with printing).
ANYTIME YOU ARE HAVING TROUBLE BOOTING UNPLUG EVERYTHING FROM THE BACK OF YOUR COMPUTER except the keyboard and monitor, and of course the power plug. Fix one thing at a time. If you just installed hardware remove it.
- Try booting with the shift key held down. This is called safe mode. If it comes up okay then sometimes you can then simply reboot and things will work normally.
- Boot from the 1st OSX install disk by inserting it and holding the C key down after rebooting. Run Disk First Aid, then run Repair Permissions from the Disk Utility (from the menu).
- Last resort - install the OS again. Make sure you don't tell it to wipe the drive. Once you have reinstalled run the latest combined update to get your system version back up to snuff.
- You can always recover from the backup you made using carbon copy cloner (assuming you made one).
- Run Repair Permissions before and after installing software.
OSX iMac WARNING: Make sure your iMac's ROM is updated to the latest version before installing OSX. You can damage your video analog board. I have had several people report this and have repaired some damaged units.
I know how to fix iMacs with this particular problem. If you installed OSX on your iMac and no longer have video display call us about getting it repaired (without having to buy an analog board most likely). Our flat rate (not including parts) is $80 plus return shipping and insurance. We do a thorough cleaning and tuneup included in this price.
PLEASE READ MY OSX Notes for installing on Beige G3 Systems!
New! OSX Notes for G4 SystemsAPPLEJACK PREINSTALLED?
We recently started preinstalling AppleJack on all OSX systems (except Leopard). This little utility (Kitchen Sink OSX Diagnostics Folder or downloadable from http://applejack.sourceforge.net/) allows you to repair your disk, repair permissions, validate the system's preference files, and get rid of possibly corrupted cache files. In most cases, these operations can help get your machine back on track. The important thing is that you don't need another startup disk with you. All you need to do is restart in Single User Mode (SUM), by holding down the command and s keys at startup, and then typing applejack, or applejack auto (which will run through all the tasks automatically), or applejack auto restart (which will also restart the computer automatically at the end of the process).
The only gotcha I have found so far is on Beige G3 systems. If you had to borrow someones monitor to install X, then your other adapted monitor probably will show you a black screen at startup. Since you simply need to type applejack auto restart, I do just that blindly and then leave the system alone. It runs through the cycles and then restarts usually getting you back up and running. There are some other warnings in the documentation so read through them thoroughly before using on your system. This is an emergency repair program and I really would not run it all the time, but it has saved me more than a few times from the hours of reinstallation.
We can provide you options and software for your installation if you do have trouble. Give us a call!
PHONE TECH SUPPORT
We love this business and live, breath and eat Macs. We thank you in advance for using the tech support line for out of warranty or systems and equipment you have bought elsewhere. 1-405-601-5301 is our tech support line. Thanks for paying for the call. We need you to help us with this as our toll free lines expenses are rising far faster than our sales are. We are always happy to help and we pay for the calls on in warranty products. Please let us know that you are on your dime when you get a tech online, our phone system doesn't show this at the work stations. Use our email form anytime you don't need immediate response or after hours. Make sure you identify the system you are on, the OS you are using and any other pertinent hardware facts.
Back to Resale.Headgap.com | Go Directly to the Headgap's Store | Read Bob's Mac Tech Tips